1. Export your WordPress database
Begin by exporting your WordPress database, where all your site’s data resides. Most hosting providers offer access to this through phpMyAdmin.
To export your database via phpMyAdmin:
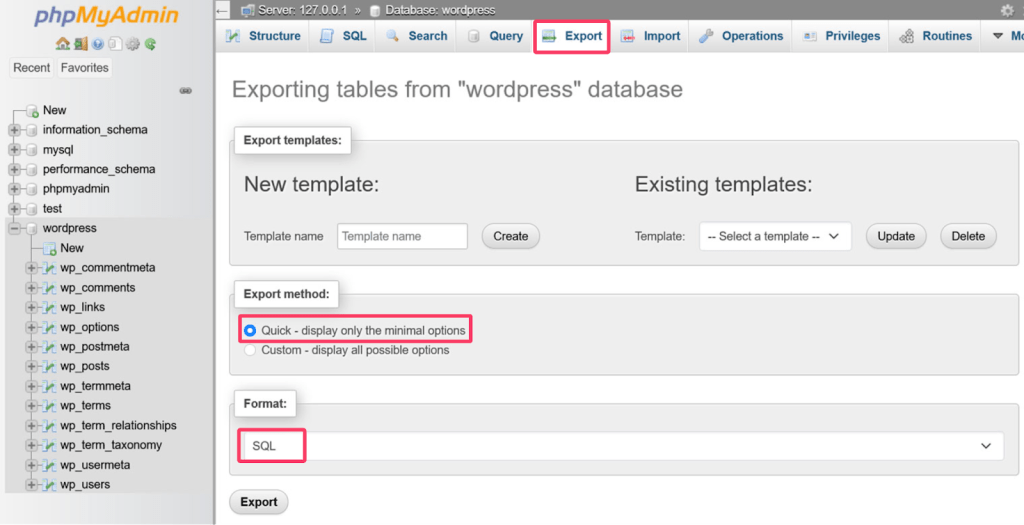
- Log into phpMyAdmin and select your database. Typically, the name will start with “wp_”.
- Go to the Export tab at the top of the interface.
- Choose “Quick – display only the minimal options” as the export method and ensure the format is set to SQL.
- Click the Go or Export button at the bottom to download the database.

Note: The downloaded file will be in .sql format. Compress this file into a zip archive and save it on your computer. This .sql file is crucial for your site’s migration, so handle it carefully.
2. Download your site files
Next, download your WordPress files. Use an FTP client like FileZilla to transfer these files to your local computer.
Here’s the process:
- Install an FTP client such as FileZilla on your computer and open it.
- Enter your hostname, FTP username, password, and port number, which you can obtain from your hosting provider.
- Click Quickconnect to connect to your server.
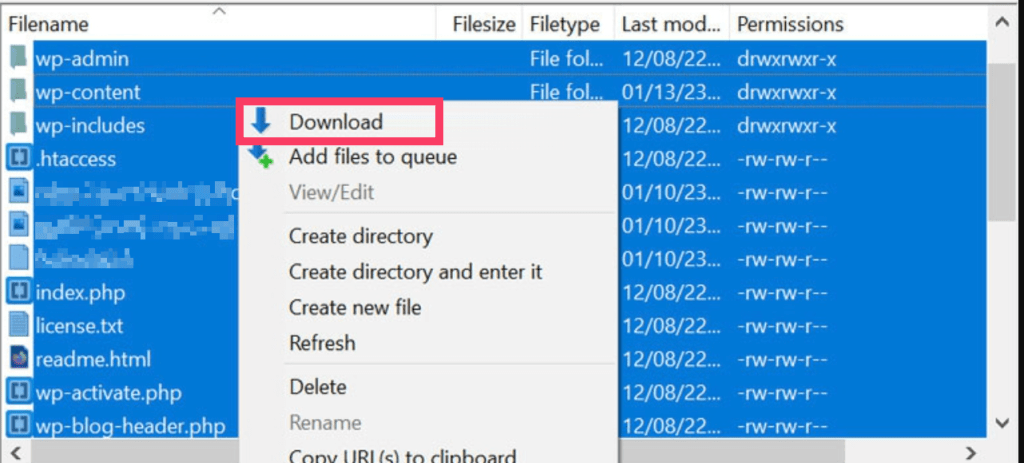
In the right panel of FileZilla, navigate to the public_html folder, which contains your WordPress installation. Select all files and folders within this directory, right-click, and choose “Download”.

Once downloaded, compress these files into a zip archive to simplify the upload to your new server.

3. Upload your site files to the new server
With your files downloaded and compressed, upload them to your new server.
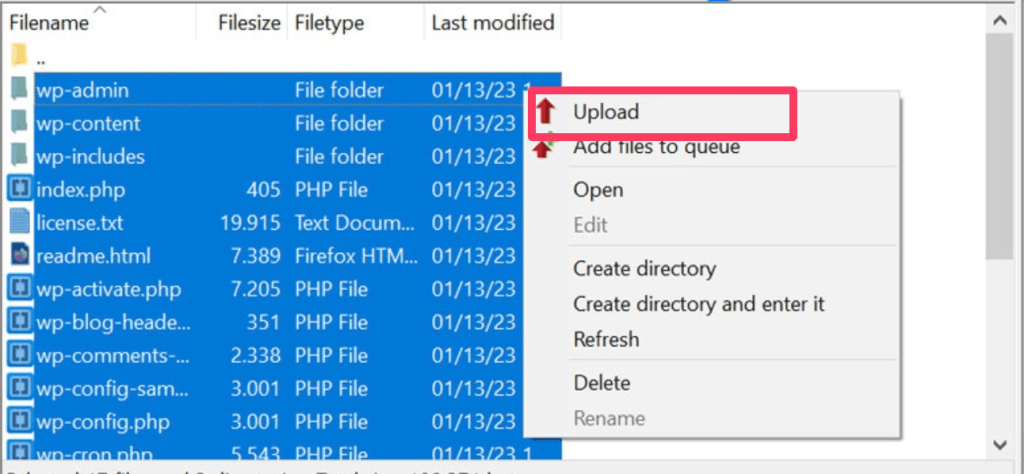
- Use FTP or the file manager provided by your new hosting provider to upload the zip archive to the public_html folder on the new server.
- If the new server has an existing site, delete its contents first to ensure a clean migration.
- After uploading, extract the zip file in the public_html directory to properly place all your WordPress files and folders.

4. Create a new database
Configuring the wp-config.php file is crucial for connecting WordPress to your new database:
- For a fresh installation: Copy and rename “wp-config-sample.php” to “wp-config.php”.
- For an existing site: Edit the existing wp-config.php file.
Open the file in a code editor and update the following lines with your new database information:
For a new WordPress setup, you’ll need to create a fresh database to import your saved SQL data. The process varies depending on your hosting provider, but there are two primary methods to create a database.
Method 1: Using cPanel
- Login to cPanel with the cPanel username and password.
- Click on the “MySQL Databases” icon.
- In the “Create New Database” section, enter a database name and click Create Database.
Method 2: Using phpMyAdmin
- Access phpMyAdmin using the provided login credentials.
- Select the Database tab. This will redirect you to a list of existing databases and an option to create a new one.
- Enter the new database name into the “Create a new database” field.
- Click Create.
5. Edit the wp-config.php file
Configuring the wp-config.php file is crucial for connecting WordPress to your new database:
- For a fresh installation: Copy and rename “wp-config-sample.php” to “wp-config.php”.
- For an existing site: Edit the existing wp-config.php file.
Open the file in a code editor and update the following lines with your new database information:
/** The name of the database for WordPress */

define( ‘DB_NAME’, ‘database_name_here’ );

/** Database username */

define( ‘DB_USER’, ‘username_here’ );

/** Database password */

define( ‘DB_PASSWORD’, ‘password_here’ );

/** Database hostname */

define( ‘DB_HOST’, ‘localhost’ );
In this section, you’ll find details like database name, username, and password. Replace this information with that of your new host.
If you’re using a new wp-config.php file, you should also replace your unique keys as well.
Once done, save the file.
6. Import your original database
Import your old database into the new one:
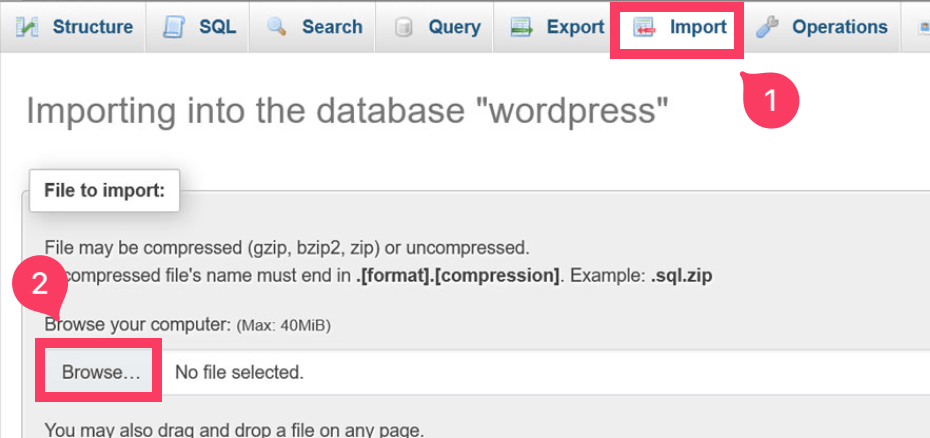
- Log into phpMyAdmin on the new sit and select the newly created database.
- Go to the Import tab and click Browse to choose and upload your .sql file.
- Click Import to begin the process.

7. Change DNS settings
Your site should now be on the new server, but you need to update the DNS settings to point to the new host.
- Log into your domain registrar's site and update the DNS settings to reflect your new server’s IP address.
- The exact steps will vary depending on where you registered your domain name. Most registrars offer clear instructions on their websites. Just search for it on your domain registrar’s website and follow their guide.
8. Update URLs (if applicable)
If you’re moving to a new domain, you need to update URLs in your database. If you’re keeping the same domain, you can skip this section:
-
Use Search Replace DB Script:
- Upload the Search Replace DB script to your server and run it through your web browser. This script will help you replace old URLs with the new domain. After using the script, remove it from your server for security reasons.
-
Alternatively, Use a Plugin:
- Install a plugin like Better Search Replace to update URLs. This method is safer and more user-friendly than using scripts.
Bonus: Simplified Migration
For a less complicated migration, consider using a WordPress migration plugin like UpdraftPlus:
-
Create a Backup:
- Use UpdraftPlus on your old site to create a backup.
-
Download the Backup:
- Download the backup files to your computer.
-
Upload and Restore:
- On the new site, install UpdraftPlus, navigate to Existing Backups > Upload Backup Files, and upload the backup file. Select the backup and click “Restore” to complete the migration.
Conclusion
Migrating a WordPress site can seem intimidating, but by following these steps carefully, you can transfer your site successfully. For those looking for an easier approach, migration plugins can simplify the process significantly. Ensure you take your time and verify each step to ensure a smooth transition.


