Partners        Payment Options        My Account       Cart

Archive

How to migrate a wordPress site manually

1. Export your WordPress database

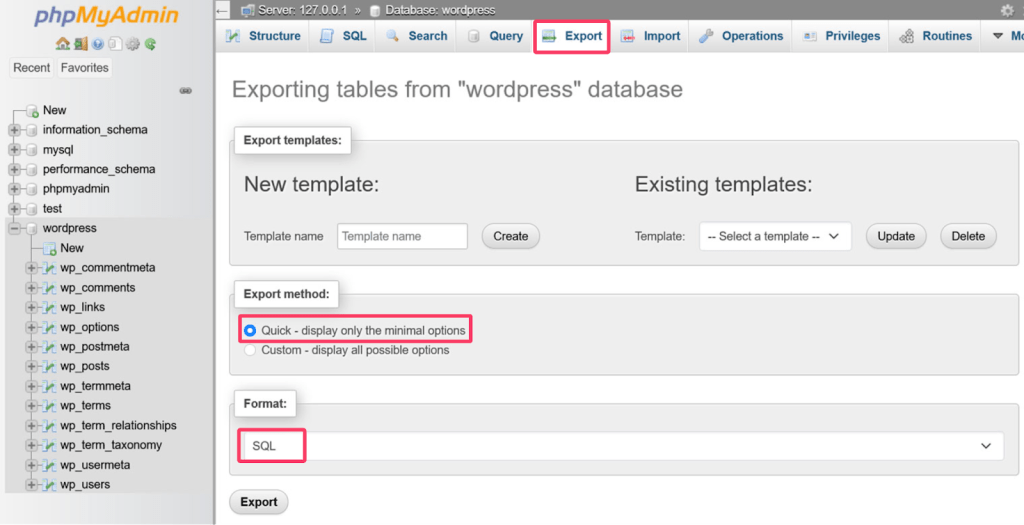
Begin by exporting your WordPress database, where all your site’s data resides. Most hosting providers offer access to this through phpMyAdmin.

To export your database via phpMyAdmin:

  • Log into phpMyAdmin and select your database. Typically, the name will start with “wp_”.
  • Go to the Export tab at the top of the interface.
  • Choose “Quick – display only the minimal options” as the export method and ensure the format is set to SQL.
  • Click the Go or Export button at the bottom to download the database.

screenshot-showing-how-to-manually-xport-your-WordPress-database-in-phpMyAdmin

Note: The downloaded file will be in .sql format. Compress this file into a zip archive and save it on your computer. This .sql file is crucial for your site’s migration, so handle it carefully.

2. Download your site files

Next, download your WordPress files. Use an FTP client like FileZilla to transfer these files to your local computer.

Here’s the process:

  • Install an FTP client such as FileZilla on your computer and open it.
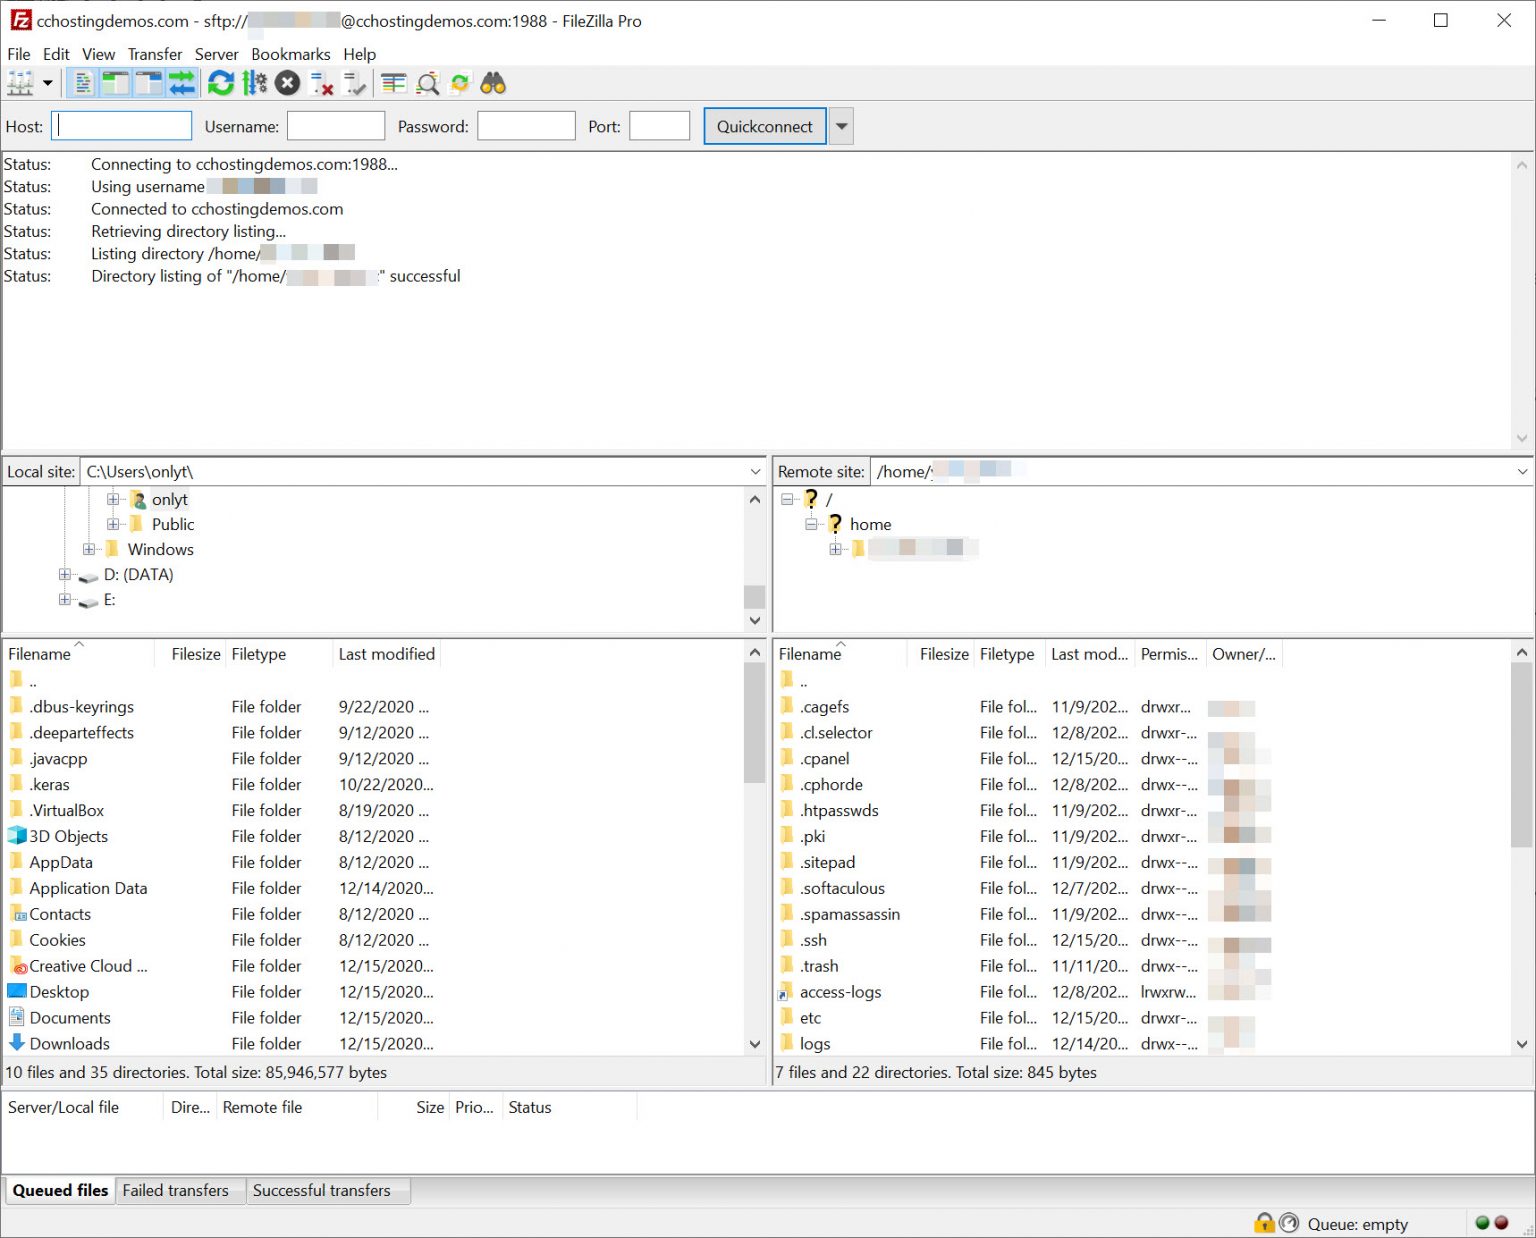
  • Enter your hostname, FTP username, password, and port number, which you can obtain from your hosting provider.
  • Click Quickconnect to connect to your server.

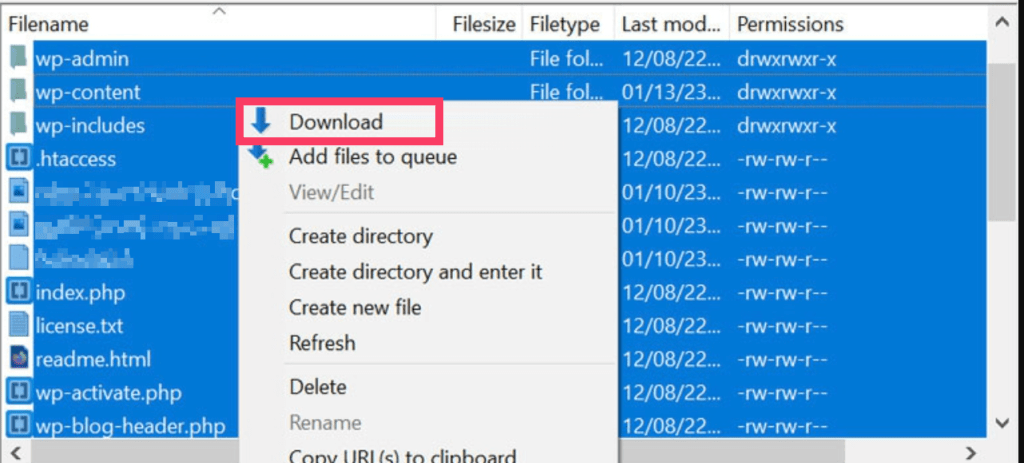
In the right panel of FileZilla, navigate to the public_html folder, which contains your WordPress installation. Select all files and folders within this directory, right-click, and choose “Download”.

quickconnect-screenshot-showing-the-quick-connect-button-in-phpmyadmin

Once downloaded, compress these files into a zip archive to simplify the upload to your new server.

screenshot-showing-show-to-manually-migrate-your-site-and-save-files

3. Upload your site files to the new server

With your files downloaded and compressed, upload them to your new server.

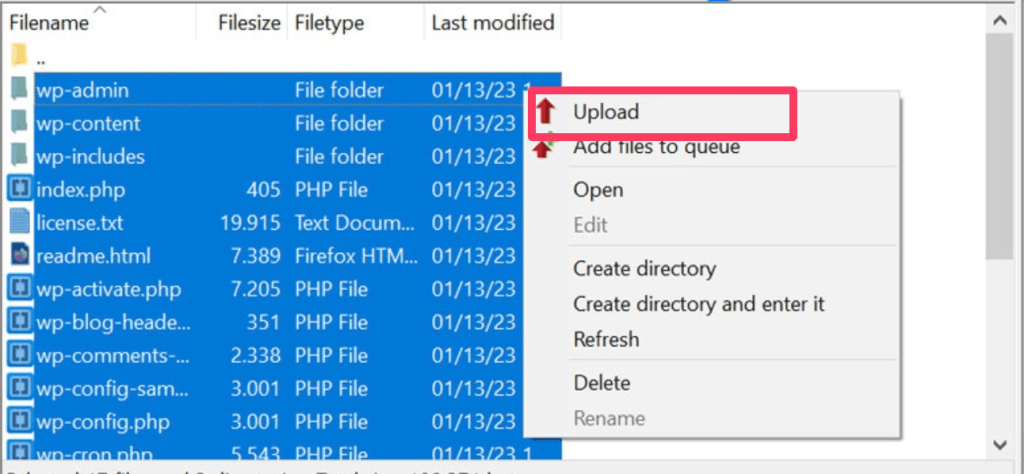
  • Use FTP or the file manager provided by your new hosting provider to upload the zip archive to the public_html folder on the new server.
  • If the new server has an existing site, delete its contents first to ensure a clean migration.
  • After uploading, extract the zip file in the public_html directory to properly place all your WordPress files and folders.

how-to-manually-upload-files-to-new-WordPress-directory

4. Create a new database

Configuring the wp-config.php file is crucial for connecting WordPress to your new database:

  • For a fresh installation: Copy and rename “wp-config-sample.php” to “wp-config.php”.
  • For an existing site: Edit the existing wp-config.php file.

Open the file in a code editor and update the following lines with your new database information:

For a new WordPress setup, you’ll need to create a fresh database to import your saved SQL data. The process varies depending on your hosting provider, but there are two primary methods to create a database.

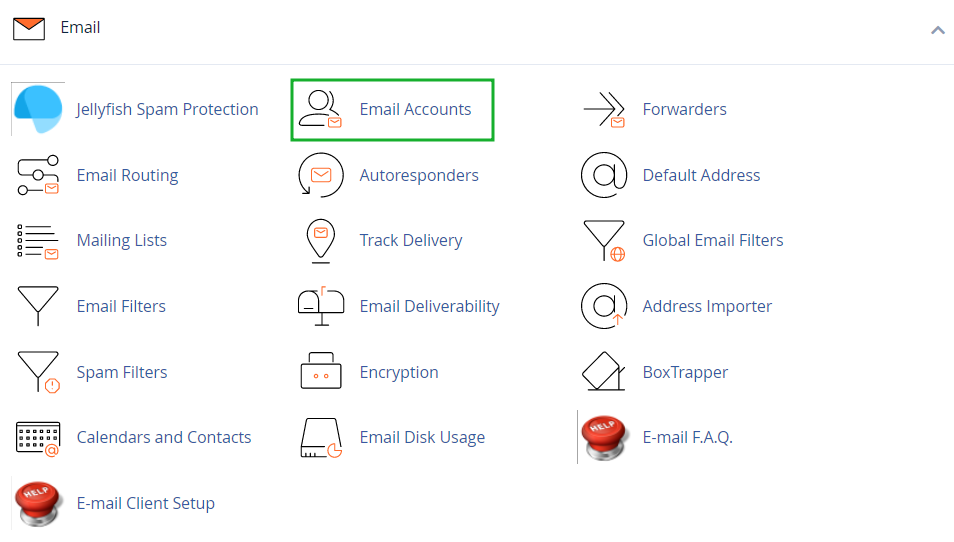
Method 1: Using cPanel

  1. Login to cPanel with the cPanel username and password.
  2. Click on the “MySQL Databases” icon.
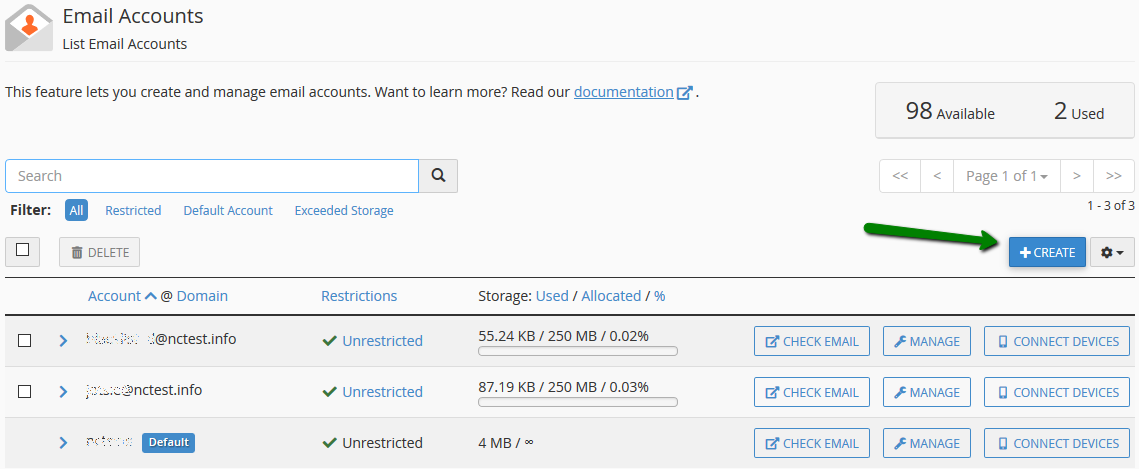
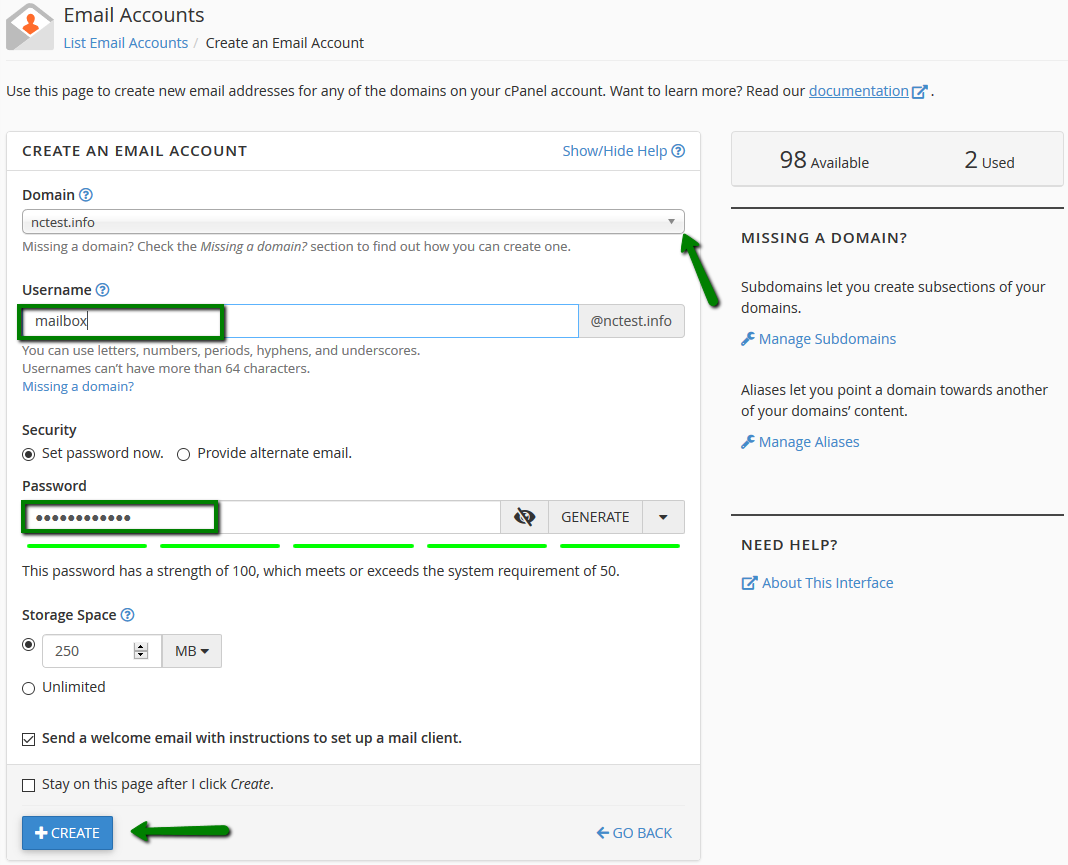
  3. In the “Create New Database” section, enter a database name and click Create Database.

Method 2: Using phpMyAdmin

  1. Access phpMyAdmin using the provided login credentials.
  2. Select the Database tab. This will redirect you to a list of existing databases and an option to create a new one.
  3. Enter the new database name into the “Create a new database” field.
  4. Click Create.

5. Edit the wp-config.php file

Configuring the wp-config.php file is crucial for connecting WordPress to your new database:

  • For a fresh installation: Copy and rename “wp-config-sample.php” to “wp-config.php”.
  • For an existing site: Edit the existing wp-config.php file.

Open the file in a code editor and update the following lines with your new database information:

/** The name of the database for WordPress */

define( ‘DB_NAME’, ‘database_name_here’ );

/** Database username */

define( ‘DB_USER’, ‘username_here’ );

/** Database password */

define( ‘DB_PASSWORD’, ‘password_here’ );

/** Database hostname */

define( ‘DB_HOST’, ‘localhost’ );


In this section, you’ll find details like database name, username, and password. Replace this information with that of your new host.

If you’re using a new wp-config.php file, you should also replace your unique keys as well.

Once done, save the file.

6. Import your original database

Import your old database into the new one:

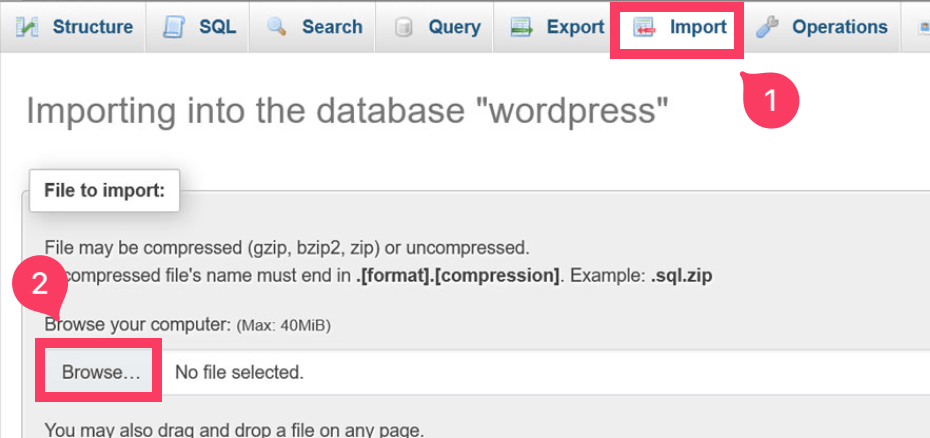
  • Log into phpMyAdmin on the new sit and select the newly created database.
  • Go to the Import tab and click Browse to choose and upload your .sql file.
  • Click Import to begin the process.


screenhot-showing-how-to-upload-files-into-wordpress-directory


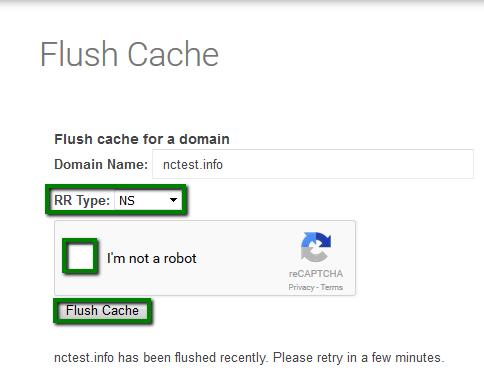
7. Change DNS settings

Your site should now be on the new server, but you need to update the DNS settings to point to the new host.

  • Log into your domain registrar’s site and update the DNS settings to reflect your new server’s IP address.
  • The exact steps will vary depending on where you registered your domain name. Most registrars offer clear instructions on their websites. Just search for it on your domain registrar’s website and follow their guide.

8. Update URLs (if applicable)

If you’re moving to a new domain, you need to update URLs in your database. If you’re keeping the same domain, you can skip this section:

  1. Use Search Replace DB Script:
    • Upload the Search Replace DB script to your server and run it through your web browser. This script will help you replace old URLs with the new domain. After using the script, remove it from your server for security reasons.
  2. Alternatively, Use a Plugin:
    • Install a plugin like Better Search Replace to update URLs. This method is safer and more user-friendly than using scripts.

Bonus: Simplified Migration

For a less complicated migration, consider using a WordPress migration plugin like UpdraftPlus:

  1. Create a Backup:
    • Use UpdraftPlus on your old site to create a backup.
  2. Download the Backup:
    • Download the backup files to your computer.
  3. Upload and Restore:
    • On the new site, install UpdraftPlus, navigate to Existing Backups > Upload Backup Files, and upload the backup file. Select the backup and click “Restore” to complete the migration.

Conclusion

Migrating a WordPress site can seem intimidating, but by following these steps carefully, you can transfer your site successfully. For those looking for an easier approach, migration plugins can simplify the process significantly. Ensure you take your time and verify each step to ensure a smooth transition.

DNS Propagation

What is DNS Propagation?


DNS propagation refers to the time it takes for changes to your domain’s DNS (Domain Name System) records, such as updating nameservers, to fully propagate or spread across all DNS servers globally. This process typically takes 24 to 48 hours to complete.
During this period, Internet Service Providers (ISPs) around the world update their cached DNS information with the new records for your domain. While some users may see the changes almost immediately, others may still be directed to the old DNS records due to varying cache refresh times across different networks.

In short, DNS propagation is the transition period where some visitors may access your website from the new server, while others are still routed to the old one until the changes have fully propagated worldwide.

Why Does DNS Propagation Take Up to 72 Hours?

Let’s imagine you’re in Bari, Italy, and you’ve just updated the nameservers for a domain hosted in Phoenix, USA. When you try to visit your domain, your request doesn’t go directly to the hosting server. Instead, it passes through several Internet Service Provider (ISP) nodes. First, your computer checks its local DNS cache, then sends the request to your local ISP in Bari. From there, it travels to an upstream provider in Rome, Italy, before connecting to an ISP in Hamburg, Germany. Eventually, the request reaches the USA through New York and finally arrives at the ISP in Phoenix, Arizona.


Here is an example of the request trace – the number of ISP nodes and their location will vary in each particular case:


Each of these ISP nodes has its own DNS cache. If the node doesn’t have the updated DNS information, it retrieves it and stores it for future use. This caching system reduces traffic and speeds up future requests, but it also causes delays in the propagation process. Because ISPs have different cache refresh intervals, the DNS information may not update at the same time across all nodes. This is why DNS propagation can take up to 72 hours for the new nameservers to fully propagate.

Pro Tip: To ensure your computer isn’t showing outdated information, clear your browser’s cache and flush the DNS cache after making DNS changes.


What Are the Ways to Pass DNS Propagation?

 1. Reduce Propagation Time (Before Changing Nameservers)

If you haven’t changed the nameservers yet and want to reduce the time for DNS propagation, here’s what to do:

    – Point to the Destination IP via A Record: Update your current DNS provider’s A record to point to the new server’s IP. Set the TTL (Time to Live) for this record to 300 seconds (5 minutes).

   – Change the Nameservers After the Update: Wait about 30 minutes after updating the A record, then change the nameservers for your domain.

This way, your domain will resolve to the old server for locations where propagation isn’t complete, while new locations will see the updated site.


 2. Use Google Public DNS (After Changing Nameservers)

If you’ve already changed your nameservers, follow these steps to access your updated site:

    – Switch to Google Public DNS: Set your DNS to use Google Public DNS servers by following [these instructions](https://developers.google.com/speed/public-dns/docs/using).

   – Clear Your Browser and DNS Cache: Clear both your browser cache and your computer’s DNS cache.

   – Flush DNS Records: Use Google’s DNS Flush tool to flush the old records (NS and A) for your domain.


If you are still seeing outdated information on your website, you can temporarily force your domain to resolve to the new IP address by editing the ‘hosts’ file on your computer. This method allows you to access your website from its new server even if DNS propagation is not complete. However, keep in mind that this will only work for you, while other users may still be directed to the old server.

Here’s how it works:

1. Edit the host file on your computer to manually map the domain to the new IP address.

2. Once the changes are made, type your website name in the browser, and it will load from the new server.

Important: After 48 hours, when DNS propagation should be complete, remember to remove the entries you added to the host file.

 Alternative: Use Proxy Services

You can also use proxy services to view your website during DNS propagation. These services allow you to access websites anonymously and check how your site looks from different locations.

How to Check if DNS Propagation is Complete

There’s no exact way to know when DNS propagation is fully complete, as it depends on factors like your ISP, TTL (Time to Live), and geographic location. However, there are a few methods you can use to track its progress.

  1. Use Online DNS Checkers: Online tools like DNS Checker allow you to check DNS propagation by showing the DNS records from servers around the world. These tools confirm whether your website is fully propagated globally.
  2. Use G Suite Toolbox: The G Suite Toolbox also offers a simple way to check DNS propagation by showing whether your domain has been updated on the global DNS network.
  3. Command Line Tools: For a more technical approach, you can run certain commands from your computer to check the IP address your domain is pointing to. Here’s how:

 For Windows Users

1. Click the Start button.

2. Go to All Programs > Accessories > Command Prompt (right-click and select Run as Administrator).

3. In the Command Prompt, type one of these commands and hit Enter:


   – `nslookup yourdomain.com`


   – `ping yourdomain.com`

   – `tracert yourdomain.com`

   Note: Replace “yourdomain.com” with your actual domain name.


For Mac Users

1. Open the Applications folder, then go to Utilities and open Terminal.

2. Type one of these commands and hit Enter:


   – `nslookup yourdomain.com`

   – `ping yourdomain.com`

   – `traceroute yourdomain.com`


If the IP address matches your new server, the propagation is complete. If it points to the old server, give it more time.


Conclusion

DNS propagation is a vital part of the process when changing nameservers or DNS records for your domain. Although it can take up to 72 hours, understanding the reasons behind the delay and knowing how to check for propagation completion can help you manage your website during this period. By using techniques like editing the hosts file or utilizing proxy services, you can access your site before global propagation is finalized. Patience is key during this time, but with the right tools, you can ensure a smoother transition.

Remember, whether you’re performing DNS changes or waiting for propagation to complete, always keep track of the progress and take steps to minimize any downtime for your visitors. 

10 Practical Steps to Optimize Website Performance and Boost Speed

Introduction  

Website performance is very important in today’s fast-paced digital world. A slow-loading website can frustrate users, affect your SEO rankings, and result in lost opportunities. Website optimization is essential for improving user experience, driving traffic, and ensuring your site is running smoothly. In this guide, we’ll walk you through practical steps to optimize your website’s performance and explore common causes of delays that could be hurting your online success.


Why Website Performance Matters  

Your website’s speed and performance play a critical role in shaping the overall user experience. Studies have shown that users expect websites to load within 2-3 seconds, and if a page takes longer, most visitors will bounce. Additionally, search engines like Google take page speed into account when ranking websites. That means faster websites tend to rank higher on search engine results pages (SERPs), driving more traffic and improving conversions.


Key Benefits of Website Optimization  

The benefits of optimizing your website extend beyond just speed. Here are a few ways it can positively impact your business:  

  • Enhanced User Experience – Faster websites keep users engaged longer, leading to lower bounce rates and higher conversion rates.  
  • Improved SEO – Search engines reward faster websites, which can boost your visibility and rankings on SERPs.
  • Increased Conversions – A well-optimized website can improve lead generation and sales by keeping users on the page and engaged.


10 Practical Steps to Optimize Website Performance


Now that you understand the importance of website optimization, let’s dive into practical steps to improve your site’s performance.


  1. Image Compression: Large images can drastically slow down your website. Use tools like TinyPNG to compress images before uploading them to ensure fast load times.


  1. Browser Caching: Implement browser caching to store static files like images and CSS in users’ browsers, speeding up load times for repeat visitors.


  1. Minify and Combine JavaScript and CSS Files: Remove unnecessary spaces, comments, and characters in your JavaScript and CSS files. Combine them to reduce the number of HTTP requests.


  1. Optimize Image Files: Choose the right formats (JPEG for photos, PNG for transparency) and consider using newer formats like WebP for better compression.


  1. Limit the Use of External Scripts: External scripts can slow down your site. Only use essential scripts, and load them asynchronously to prevent delays in page rendering.


  1. Limit Redirect Usage: Reduce the number of redirects as they can add latency to your website. Fewer redirects lead to faster loading times.


  1. Code Minification: Clean up your HTML, CSS, and JavaScript by removing unnecessary characters to reduce file sizes and improve load speed.


  1. Prioritize Content Rendering: Load important content first, such as images and text above the fold, and use lazy loading for less critical elements.


  1. Mobile Optimization: Make sure your website is responsive and loads quickly on mobile devices. Google favours mobile-optimized sites for ranking.


  1. Font Optimization: Only load the necessary font styles and weights, and use font loading techniques to reduce the impact on site performance.


Tools for Monitoring Website Performance  

To ensure your website is performing at its best, regularly test it using tools like:  

  • Google PageSpeed Insights – Provides suggestions to improve website performance.  
  •  GTmetrix – Analyze your website speed and offer optimization tips.  
  •  Pingdom – Allows you to test website speed from different locations worldwide.


Common Website Performance Issues to Watch Out For  

Some common issues that can cause slow websites include:  

  • Unoptimized Images  
  •  Excessive Use of Plugins  
  •  Too Many HTTP Requests  
  •  Server Response Time  
  •  Unclean Code  


By identifying and fixing these issues, you can significantly improve your website’s speed and overall performance.


Final Thoughts  

Optimizing your website’s performance is important for improving user experience, boosting your search engine rankings, and keeping visitors engaged. Implement the steps we’ve outlined to ensure your website runs smoothly and efficiently. With regular monitoring and adjustments, you’ll maintain a fast, optimized website that supports your online success. If you’re looking for hands-off management, consider managed hosting services that can take care of the technical aspects of website optimization for you.


How to Change Web Servers Smoothly: A Step-by-Step Guide

Technology is constantly evolving, and your current server might not always meet your needs. Whether you require more bandwidth, memory, or other resources to keep your websites running smoothly, upgrading to a new server can be the solution. Once you’ve found a web host that fits your requirements, it’s time to make the switch. In this article, we’ll guide you through the process of moving to a new web server.


What is a Web Server?

A web server is a combination of software and hardware that processes HTTP or HTTPS requests, enabling web applications and websites to be displayed in your browser. Web servers play a crucial role in the functioning of the Internet by transferring data from one server to another. They are used by a wide variety of entities, including non-profit organizations, governments, small businesses, large enterprises, web hosts, and individual website owners. Some popular web servers include:

  • Apache

Apache is an open-source web server developed by the Apache Software Foundation. It is compatible with various operating systems such as Linux, Unix, and Microsoft Windows, among others.

  • Nginx

Nginx is a web server that functions as a reverse proxy, load balancer, and email proxy. Like Apache, Nginx is also open-source and available for free.

  • Microsoft IIS 

Microsoft IIS (Internet Information Services) is a web server developed by Microsoft, designed to work seamlessly with ASP.NET applications and is part of the Windows family.

  • LightSpeed

LightSpeed web servers are developed by LightSpeed Technologies and are known for their fast load times. They share similar features with Apache but are generally proprietary, although an open-source version is available. 


Pros and Cons of Changing Web Servers

Before moving forward, it’s important to weigh the pros and cons of switching to a new web server. This can help you decide whether it’s the right step for your website or application.

Pros:

  • Improved Performance: A new server may offer better bandwidth, memory, and processing power, leading to faster load times and a smoother user experience.
  • Enhanced Security: Upgrading your web server can provide stronger security features and better protection against cyber threats.
  • Scalability: New servers often offer more flexibility and options to scale as your website or application grows.
  • Advanced Features: You might gain access to more advanced software, plugins, or configurations tailored to your specific needs.

Cons:

  • Downtime Risk: During the transition, there is a risk of website downtime, which can temporarily affect user experience or business operations.
  • Technical Complexity: Migrating to a new server requires technical knowledge. Misconfigurations can lead to issues like broken links, database errors, or lost data.
  • Cost: Depending on the server you choose, upgrading may result in higher costs for hosting, particularly with dedicated or VPS servers.
  • Compatibility Issues: Some software or applications might not be fully compatible with the new server, requiring additional adjustments or updates.

8 Steps to Change Web Servers

Here’s a step-by-step guide to switching web servers:

  1. Evaluate the Current Web ServerBefore making the switch, assess your current web server. Identify the reasons for the change—whether it’s due to performance issues, security concerns, software compatibility, or the need for scalability. Creating a checklist of what your current server lacks will help you choose a new one that meets your needs.
  1. Choose a New Web Server : Once you’ve evaluated your needs, it’s time to explore your options. There are many web servers to choose from, each with its own pros and cons. Don’t hesitate to ask the sales team questions to find the best fit for your website or application.
  1. Install the New Web Server : After selecting a web server, you’ll need to install it. Some web hosts offer servers with pre-installed software, while others may require you to manage the installation yourself. If you’re handling your own server, you can opt for server colocation or install specific software on a VPS or dedicated server. Be sure to follow the installation documentation carefully, as you may need to install additional software or dependencies.
  1. Configure the New Web Server: Once installed, configure the server to meet your needs. This includes setting up virtual hosts, SSL certificates, and other necessary configurations. Refer to the configuration guides for your specific server to ensure everything is set up correctly.
  1. Test the New Web Server:  Before making the final switch, test the new server thoroughly. Check your website or application, ensure pages load correctly, and verify that forms, scripts, and databases function as expected. Testing allows you to catch any potential issues before going live.
  1. Migrate Your Website or Application: If all tests go smoothly, it’s time to migrate your website or application. This involves copying files, databases, and configurations from the old server to the new one. Depending on the server type, the migration process may vary, so consult specific migration guides. Your web host may also offer migration support, sometimes for a fee.
  2. Update DNS Records  : After the migration, update your DNS records with your domain registrar to point to the new server. DNS propagation may take anywhere from 12 to 72 hours. During this period, you may experience downtime or be served from the old server, so check regularly to avoid missing emails or form submissions.
  3. Check the Website or Application on the New Server : Once the DNS has propagated, verify that everything on the new server is working as expected. Even if testing was successful, issues can still arise in a live environment, so double-check the website or application to ensure a smooth transition.

In Summary

Thank you for reading this simple guide on changing web servers. While switching servers can get quite technical, with patience, it’s a manageable process. If you’d rather not spend your time handling the migration yourself, consider opting for a managed hosting plan. These plans often include migration assistance, making the transition smoother and stress-free. With managed hosting, you can focus on growing your business while leaving the technical details of server migration to the experts.


Step-by-Step Guide to Setting Up a Domain Redirect in cPanel

You can create various web redirects using your cPanel account, including both Temporary and Permanent options.

Temporary Redirects

Temporary redirects (status code 302 – Found) are useful when your website needs to be temporarily unavailable. For example, during site maintenance, you can redirect visitors to a temporary page, informing them that the site will be back soon.

Permanent Redirects

Permanent redirects (status code 301 – Moved Permanently) are used to inform visitors and search engines that a web page or site has permanently moved to a new location. This method allows search engines to transfer ranking and value signals to the new URL, recognizing it as the permanent home for the content. This type of redirect is ideal when you move your website to a new domain name.

Steps to Set Up a Domain Redirect in cPanel:

  1. Log into cPanel.
  2. Navigate to the “Redirects” section found under the Domains category.

  1. On the Add Redirect page, choose the type of redirect (Permanent 301 or Temporary 302) from the “Type” drop-down menu.
  2. Select the domain you want to redirect from the next drop-down menu.
  3. For the slash ‘/’ field, enter any necessary folder names.
  4. In the “Redirects to” section, type the address you want the domain to redirect to.
  5. Choose one of the following options:
    • “Only redirect with www.”
    • “Redirect with or without www.”
    • “Do Not Redirect www.”
  6. Check the Wild Card Redirect box if you want to add the file or folder name after the URL when it redirects (e.g., domain.com/file.php redirects to domain2.com/file.php).
  7. Click the “Add” button to finalize your settings.


How to Upload Files via FTP Using FileZilla

FileZilla is a widely used tool for transferring files on Linux, macOS, and Windows. It’s free, open-source, and offers a user-friendly interface along with advanced features like bookmarks, pausing and resuming large file transfers, a tabbed interface, and remote file searching. 

Although FileZilla is powerful, it can be intimidating for some users. But don’t worry! This guide will show you how to connect to your website’s hosting server using FTP and upload a ZIP file with FileZilla.

How to Download and Install FileZilla

FileZilla is an open-source application, meaning its code is publicly available for review and modification. However, this also means that others could create modified versions that might include harmful software. To avoid this, you can download the official version of FileZilla from its website by clicking this link. Once there, click the gray “Download FileZilla Client” button.

Their website will automatically detect your operating system and display a green button to download the FileZilla Client.

Click this button to download the application. Then open the downloaded file and install.

Using FileZilla to Connect via FTP

1. Launch FileZilla and input your FTP login details in the fields at the top of the application.

2. You’ll need the following information for your server’s FTP account:

Host: This could be your domain name or the server hosting your account
Username: Your cPanel username
Password: Your cPanel password
Port: 21 (leave this blank if you want the default port to be used)

3.Click the “Quickconnect” button.


Your computer will establish a connection with your web server. On the left side of the FileZilla window, you’ll see the directory of folders and files from your local computer. The right side displays the directory of folders and files on your web server.

Using FileZilla to Upload Files via FTP

The interface is straightforward. The top half of the application displays logs of transfers, while the left middle section shows your computer’s directory, and the middle right section shows the server’s directory. I have a ZIP file containing the latest release of WordPress in my Downloads folder that I want to upload to my public_html folder. To do this, I’ll navigate to my Downloads folder on the left side of FileZilla. Then, on the right side, I’ll locate and open the public_html folder.

To transfer the WordPress ZIP file to the public_html folder, I’ll click on it once and then drag and drop it into the public_html folder, as shown here:

Notice that the small section at the bottom shows the transfer status of the ZIP file. Once the transfer completes, you’ll see the ZIP file in the public_html folder on the right side, alongside the other files and folders. You can also copy multiple files by selecting them with your mouse or holding the CTRL (Windows) or CMD (Mac) key and clicking on individual files.

How to create email account in cpanel

To create a new email account in cPanel, follow these steps:

1. Log in to cPanel: Access your cPanel dashboard and go to the Mail section, then select Email Accounts. You can quickly access this menu through cPanel Shortcuts in your account dashboard.

2. Create a New Email Account:Click the +Create button.

3. Configure and Finalize: If you manage multiple domains, choose the domain for the new email account from the drop-down menu in the top right corner. Enter your desired email address. You can either set the password immediately or provide an alternate email address, where the system will send a link to configure the password. After entering the necessary details, click +Create to finalize your new email account.

 4. Accessing Webmail: To log in to webmail, click Check Email next to the relevant email account. You can then choose your preferred webmail interface, such as Roundcube.

Alternatively, you can access cPanel webmail directly using one of these URLs:

  • https://yourdomain.com:2096
  • https://yourdomain.com/webmail
  • http://webmail.yourdomain.com

Note: If you use the http://webmail.yourdomain.com link, you might encounter a broken interface or connection error with the Horde webmail client. This is due to a port mismatch, as the proxy link uses port 80, while cPanel is configured to use port 81.

That’s it! Your email account is now ready to use.

How to set up and manage FTP accounts in cPanel

This guide will walk you through the process of creating and managing FTP accounts using cPanel.

Creating an FTP Account in cPanel

  1. Log into your cPanel account.
  2. Navigate to the “Files” section and click on “FTP Accounts.”

   3. Under the “Add FTP Account” section, complete the following details:

    • Login: Enter the username for the FTP account. The full FTP username will be in the format user@domain.extension. Including your domain name is mandatory.
    • Password: Choose a strong password. If you need assistance, use the “Password Generator” tool.
    • Directory: The directory path will be auto-filled, but you can modify it. This directory will be the root folder the FTP account can access. To grant full access to your file system, enter a forward slash “/”.
    • Quota: Specify the maximum disk space (in MB) the FTP user can utilize, or set it to unlimited.

Click the “Create FTP Account” button. A confirmation message stating “Account Created” will appear.

How to delete an FTP account in cPanel

  1. Log into your cPanel account.
  2. Go to the “Files” section and select “FTP Accounts.”

    3. From the “FTP Accounts” list, find the user you want to remove and click “Delete.” Double-check to ensure you’re deleting the correct user.

    4. Optionally, you can choose to delete the user’s home directory, which will permanently remove all files associated with this FTP account. Be cautious with this option.

    5. Click the blue “Delete” button to remove the FTP account.

How to change the password for an FTP account in cPanel

If you need to change the password for an additional FTP account:

  1. Log into your cPanel account.
  2. Navigate to the “Files” section and select “FTP Accounts.”

3. From the “FTP Accounts” list, click on the “Change Password” link for the relevant user. Ensure that you set a new password for the correct FTP account.

4. Click the blue “Change Password” button to update the password.


How to disable wordpress heartbeat

The WordPress Heartbeat API is a server polling tool integrated into WordPress, designed to facilitate near-real-time updates on the frontend. This API operates by making AJAX calls through the admin-ajax.php file. However, if you observe an unusually high volume of POST requests directed at this file, it may indicate that you need to reduce the frequency of the WordPress Heartbeat API or consider disabling it entirely.

Excessive requests to admin-ajax.php can significantly increase CPU usage on your server, potentially leading to performance issues. To completely disable this functionality and prevent it from contributing to the overall CPU time and the number of executions on your website, you can insert specific code into your site.

Go to the functions.php file of your WordPress theme and paste these lines right after the opening <?php tag:

add_action( 'init', 'stop_heartbeat', 1 );
function stop_heartbeat() {
wp_deregister_script('heartbeat');
}

How to Restrict WordPress Heartbeat

If you prefer not to disable the Heartbeat API entirely, you can opt to limit its execution frequency instead. This can be accomplished using a plugin like Heartbeat Control. After installing and activating the plugin, you can adjust the Heartbeat API frequency to intervals of 60 seconds or more. It’s advisable to set the Heartbeat locations to “Allow only on post edit pages” to further reduce unnecessary server load. By properly managing the WordPress Heartbeat API, you can optimize your site’s performance and prevent excessive resource usage, ensuring a smoother experience for both administrators and users.

And that’s it! With these steps, you can effectively control how WordPress Heartbeat operates on your website.

Step-by-Step Guide to Registering Domain Names with Special Characters

You can register domain names that include special characters, such as accents or non-Latin scripts, using a method called Punycode. This process converts these characters into a format that can be recognized by the Domain Name System (DNS). In this guide, we will provide a detailed explanation of how Punycode works and guide you through the steps to successfully register your unique domain name with special characters

What is Punycode?

To understand Punycode, it’s important to first know about Unicode and ASCII, since Punycode is a way of representing Unicode characters using the limited ASCII character set that is typically used for internet domain names.

Unicode is a universal standard for encoding, representing, and processing text across most of the world’s writing systems. It is widely used on the web, often in the UTF-8 encoding format.

ASCII stands for the American Standard Code for Information Interchange. It is an older character encoding standard that was originally developed from telegraph code and is still commonly used in electronic communications.

Punycode allows you to represent special characters from different languages using ASCII, making it possible to register domain names with those characters.

Registering a Domain Name with Special Characters

To register a domain with special characters, you need to convert it into its Punycode equivalent. Once converted, you can register the domain just like any other. After registration, typing the original domain with special characters into your browser will direct you to the correct site.

Converting Special Characters to Punycode

You can use online tools like the domain converter available at Charset.org to convert your domain name from its special character format into the IDNA (Internationalizing Domain Names in Applications) format, which uses Punycode.

If you have any questions or need assistance, feel free to reach out for support. We’re available 24/7 and are happy to help!