How to Set Up Offsite Backups to Amazon S3 or Google Drive
When it comes to website hosting, one of the most crucial steps you can take to secure your online presence is setting up offsite backups. Offsite backups ensure that even if your main server experiences data loss or corruption, your website files remain safe on external ...
How to Install and Update Applications Using Softaculous in cPanel
Installing and managing web applications manually can be time-consuming — from creating databases to uploading files and configuring permissions. That’s where Softaculous comes in.
Softaculous is a one-click application installer available in cPanel on Sternhost hosting accounts. It allows you to install, update, clone, and manage hundreds of ...
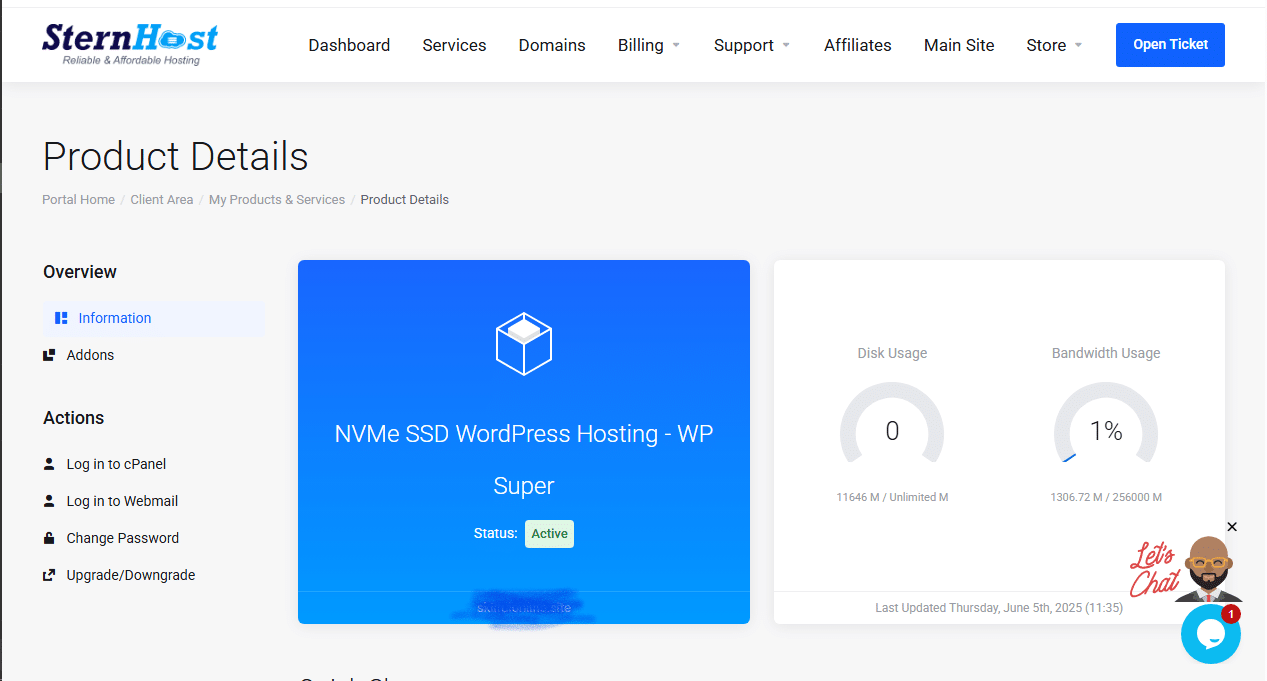
How to Manage Your Hosting Account from the Sternhost Client Area
Managing your web hosting is simple with the Sternhost Client Area. This portal gives you full control over your hosting plans, domains, billing, and support — all from one dashboard.
Here’s how to use it effectively:
1. Log In to Your Client Area
Go to https://sternhost.com/
Enter your registered ...

5 Smart Ways to Boost Your Website’s Conversion Rate Without Spending More on Ads
Driving traffic to your website is only half the battle — converting visitors into customers is where the real growth happens. Many businesses pour money into ads without realizing simple tweaks can dramatically increase conversions. In this post, we’ll explore five proven strategies to boost your website’s ...
How to Fix “Too Many Redirects” Error on Your Website
Have you ever tried opening your website only to see this frustrating message?
“This page isn’t working — redirected you too many times.”
This is known as a redirect loop, and it prevents visitors (and you) from accessing your site.The good news? It’s easy to fix once you understand ...

How to Fix “Mixed Content” Warnings After Installing an SSL Certificate
You’ve installed your SSL certificate successfully, but your website still shows a “🔒 Not Secure” or “Mixed Content” warning in the browser.Don’t worry — this is one of the most common hosting issues website owners face after switching from HTTP to HTTPS.
In this guide, we’ll show you ...

How to Use AI Chatbots to Automate Customer Support on Your Website
Your customers expect fast, accurate support — 24/7. But hiring around-the-clock staff can be expensive and inefficient.That’s where AI chatbots come in. These smart assistants can automatically respond to common questions, gather leads, and even route complex issues to your support team.
In this guide, we’ll show you ...
Setting Up WordPress Multisite on Sternhost
If you manage multiple websites, switching between separate WordPress dashboards can quickly become overwhelming. Thankfully, WordPress Multisite offers a powerful way to control several websites from one installation. In this guide, we’ll show you how to set up WordPress Multisite on Sternhost, step-by-step — so you can ...
Setting Up AI-Based Spam Protection for Email
Email is one of the most important communication tools in business—but it’s also one of the easiest targets for spam, phishing, and malware attacks. With increasing sophistication in spam techniques, traditional filters often fall short. That’s where AI-based spam protection comes in, offering smarter, adaptive security that ...

Adding AI-Powered Search to Your Website
A traditional website search bar can only do so much — it matches keywords but misses context. Today’s users expect smarter results, faster responses, and more personalized experiences. This is where AI-powered search comes in.
In this guide, we’ll explore how to add AI-powered search to your website, ...
- 1
- 2